
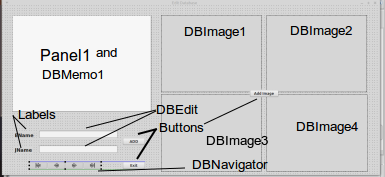
1) Start Lazarus. Create a new application. Starch the form to almost fill the screen. 2) Drop TDataSource and TDbf from the "Data Access" tab on the form. 3) Drop TPanel from the "Standerd" tab on the form. Starch it to fit like the white part above. 4) Drop 4 TButtons on the form. Click on Button1. In the "Object Inspector" (OI) Button1 -> Caption type Add Roll. Click on Button2. In the OI -> Button2 -> Caption type Exit. Click on Button3. in the OI -> Caption type Exit. Click on Button4. in the OI -> Caption type New Roll. 6) Drop 2 TLabels on the form. Click Label1 in the OI -> Label1 -> Caption type First Name. Click on Label2 in the OI -> Label2 -> Caption type Last Name. NOTE You can change the size and type of the font. By Clicking on the Label and in the IO -> Font -> Button to right. Next click on the "Data Controls" tab. 1) Drop 2 TDBEdit, 1 TDBNavigator, 1 TDBMemo (On top of the Panel1), and 4 TDBImage controls on your form. Save project. Project -> "Save Project as" 2) Click on the DBMemo control, on your form, and in OI -> Aligen = alClient (From dropdown menu). If the DBMemo fills the form and not the Panel. A) In OI window (Tree at top) Drag DBMemo1 under Panel1. ->Your form looks like this.3) Move the controls around tell they look like the image at top of this page. NOTE Click on DBImage1 and size it to the way you like. In the OI -> width click on the width. Click on DBImage2 and change the width to the same number. Click on DBImage1. In the OI -> height click the height. Click on DBImage2 and change the height to the same number. Set OI -> click Stretch = True on all the DBImage controls. Do same with the rest of the DBImage controls. New you form look something like this.
Save project. Project -> "Save Project" 4) Drop a TImage from the "Additional" tab. Chane the width and height to the same as the DBImage controls. In the OI -> width and Height. In the OI -> click Stretch = True. In the OI -> Visible = False. [ ] (False) In the OI window right-click Image1:TImage -> Z-Order -> Move To Back. It does not mater where the Image control is on the form. It is Invisible. Save project. Project -> "Save Project" ------------------------------------------------------------------------------- Create a sub-directory in you project directory. like /home/me/lazarus/projects/DatabaseTest is you project directory then. create the directory data there. /home/me/lazarus/projects/DatabaseTest/data This is where your database file will be created. What if I do not know where my project is? Click Project (top of lazarus' form) "Save Project". Then click Project -> "Save Project As". And it will tell you where the project is. Create the data sub-directory in that directory. -------------------------------------------------------------------------------- Next do a project backup. Until the database is setup, they can be problematic. Goto the project directory. Create a sub-directory backup. In the backup sub-directory. Create a sub-directory 1. /backup/1 . Copy all the files and directories except backup into the sub-directory 1. The next backup directory will be 2. -------------------------------------------------------------------------------- New we need to connect the database controls to the database files. 1) Click on the Datasource1 control. OI -> DataSet -> (drop-down) chouse DBf1. 2) Click on the DBf1 control. In the OI -> "FilePathFull" type the path to the data directory. That you create above. OI -> OpenMode -> omAutoCreate. OI -> Storage -> stoFile. OI -> StoreDefs = True. OI -> TableLevel = 7. OI -> data.dbf OI -> Version = 7.0. Save Project. OI -> FieldDefs -> button. Opens a window called Editing Dbf1. This is the column definitions. Add in the OI -> Name = First Name (32 charters max). and DataType -> (from the drop-down) is ftString. Size = 20. Add in the OI -> Name = Last Name. and DataType is ftString. (it is a string). Size = 12. Add in the OI -> Name = Memo and DataType is ftMemo. Size = 6. Add in the OI -> Name = Image1 and DataType is ftGraphic. Size = 6. Add in the OI -> Name = Image2 and DataType is ftGraphic. Size = 6. Add in the OI -> Name = Image3 and DataType is ftGraphic. Size = 6. Add in the OI -> Name = Image4 and DataType is ftGraphic. Size = 6. Save project. A) Click on DBImage1 OI -> DataSource1 and OI -> DataFeild = Image1. B) Click on DBImage2 OI -> DataSource1 and OI -> DataFeild = Image2. C) Click on DBImage3 OI -> DataSource1 and OI -> DataFeild = Image3. D) Click on DBImage4 OI -> DataSource1 and OI -> DataFeild = Image4. NOTE: I have had problems with this. So, you may have to work with it. Backup project. OI -> Dbf1 -> Active = True. This will create 2 file in the data directory. If it does not or if there is an error. Redo the steps above. 3) Click on the DBNavigator1 control. In the OI -> DataSource from the drop-down menu choose "Datasource1". In the OI -> VisibleButton (To the right) > Click it. This will expose a list. Uncheck nbCancel, nbDelete, nbEdit, nbInsert, nbPost, and nbRefresh. SAVE your work (often). Project -> Save Project at top of Lazarus' form. 4) Click on the DBMemo control in the OI -> DataSource chouse DataSource1; OI -> DataField = Memo. 5) Click on the DBEdit1 control in the OI -> DataSource chouse DataSource1 and OI -> DataField = First Name. Click on the DBEdit2 control in the OI -> DataSource chouse DataSource1 and OI -> DataField = Last Name. 6) Double-click on the Exit button. In the function procedure TForm1.Button2Click(Sender: TObject); Type Form1.Close; 7) Double-click on the ADD Roll button. In the function. procedure TForm1.Button1Click(Sender: TObject); begin ///This will click on the invisible button /// on the DBNavigator control called Insert. DBNavigator1.BtnClick(nbPost); ///Stores Entry. DBNavigator1.BtnClick(nbInsert); ///Creates a new entry. end; 8) Add ImgNum: integer; and uses clipbrd; to the code editor near the top. var Form1: TForm1; ImgNum: integer; ///<---- implementation {$R *.lfm} uses ///<---- clipbrd; ///<---- 9) Click on the form (not on any controls on the form). Oi -> Form1:TForm1 Tab "Events" -> OnCreate Click on the button to the right. [...] Add ImgNum := 0; to the function. (procedure) procedure TForm1.FormCreate(Sender: TObject); begin ImgNum := 0; DBNavigator1.BtnClick(nbInsert); ///Creates a new roll. end; 10) Double-click on the Add Image button. In the function ---------------------------------------------------------- ///add Image button. Add image from clipboard to dbImage. procedure TForm1.Button3Click(Sender: TObject); var Fid:integer; begin ///Is the content, of the clipboard, an image? Fid:=Clipboard.FindFormatID('image/bmp'); ///EName must be filled first. if(Length(DBEdit1.Text) < 8) then begin ShowMessage('EName is too short.'); Exit; end; ///if the clipboard has an image on it. if Fid<>0 then begin ///if the first image. if(ImgNum = 0) then begin ///Change ImgNum to 1. ImgNum := 1; ///DbImage does store headers. dbImage1.WriteHeader:=True; ///You can not assign a clipboard image to a dbImage. ///So, assign it to a Image picture then to dbImage picture. ///Assign the clipboard image to Image1. Image1.Picture.Assign(Clipboard); ///Assign Image1 picture to the dbimage1 picture. dbimage1.Picture.Assign(Image1.Picture); ///Exit the Exit; end; ///If image 2. if(ImgNum = 1) then begin ImgNum := 2; ///DbImage does store headers. dbImage2.WriteHeader:=True; ///TImage to DbImage. Image1.Picture.Assign(Clipboard); dbimage2.Picture.Assign(Image1.Picture); Exit; end; if(ImgNum = 2) then begin ImgNum := 3; ///DbImage does store headers. dbImage3.WriteHeader:=True; ///TImage to DbImage. Image1.Picture.Assign(Clipboard); dbimage3.Picture.Assign(Image1.Picture); /// Exit; end; if(ImgNum = 3) then begin ImgNum := 0; ///DbImage does store headers. dbImage4.WriteHeader:=True; ///TImage to DbImage. Image1.Picture.Assign(Clipboard); dbimage4.Picture.Assign(Image1.Picture); Exit; end; end else ShowMessage('Clipboard Does not cantain an image.'); end; Save Project. Press F9 to run the program.
unit Unit1;

{$mode objfpc}{$H+}

interface

uses
  Classes, SysUtils, db, dbf, FileUtil, Forms, Controls, Graphics, Dialogs,
  ExtCtrls, StdCtrls, DbCtrls, DBGrids;

type

  { TForm1 }

  TForm1 = class(TForm)
    Button1: TButton;
    Button2: TButton;
    Button3: TButton;
    Button4: TButton;
    DataSource1: TDataSource;
    DBEdit1: TDBEdit;
    DBEdit2: TDBEdit;
    Dbf1: TDbf;
    DBGrid1: TDBGrid;
    DBImage1: TDBImage;
    DBImage2: TDBImage;
    DBImage3: TDBImage;
    DBImage4: TDBImage;
    DBMemo1: TDBMemo;
    DBNavigator1: TDBNavigator;
    Image1: TImage;
    Label1: TLabel;
    Label2: TLabel;
    Panel1: TPanel;
    procedure Button1Click(Sender: TObject);
    procedure Button2Click(Sender: TObject);
    procedure Button3Click(Sender: TObject);
    procedure Button4Click(Sender: TObject);
    procedure FormCreate(Sender: TObject);
  private
    { private declarations }
  public
    { public declarations }
  end;

var
  Form1: TForm1;
  ImgNum: integer;

implementation

{$R *.lfm}

uses
  clipbrd;

{ TForm1 }

///Add Roll button.
procedure TForm1.Button1Click(Sender: TObject);
begin
  DBNavigator1.BtnClick(nbPost);    ///Stores Entry.
  DBNavigator1.BtnClick(nbInsert);  ///Creates a new entry.
end;
///Exit button.
procedure TForm1.Button2Click(Sender: TObject);
begin
  Form1.Close;
end;
///Add image button.
procedure TForm1.Button3Click(Sender: TObject);
var
  Fid:integer;
begin

  ///Is the content, of the clipboard, an image?
  Fid:=Clipboard.FindFormatID('image/bmp');
  ///EName must be filled first.
  if(Length(DBEdit1.Text) < 8) then begin
     ShowMessage('EName is too short.');
     Exit;
  end;
  ///if the clipboard has an image on it.
  if Fid<>0 then begin
	  ///if the first image.
     if(ImgNum = 0) then begin
		  ///Change ImgNum to 1.
        ImgNum := 1;
        ///DbImage does store headers.
        dbImage1.WriteHeader:=True;
        ///You can not assign a clipboard image to a dbImage.
        ///So, assign it to a Image picture then to dbImage picture.
        ///Assign the clipboard image to Image1.
        Image1.Picture.Assign(Clipboard);
        ///Assign Image1 picture to the dbimage1 picture.
        dbimage1.Picture.Assign(Image1.Picture);
		  ///Exit the
        Exit;
     end;
     ///If image 2.
     if(ImgNum = 1) then begin

        ImgNum := 2;
        ///DbImage does store headers.
        dbImage2.WriteHeader:=True;
        ///TImage to DbImage.
        Image1.Picture.Assign(Clipboard);
        dbimage2.Picture.Assign(Image1.Picture);
        Exit;
     end;
     if(ImgNum = 2) then begin
        ImgNum := 3;
        ///DbImage does store headers.
        dbImage3.WriteHeader:=True;
        ///TImage to DbImage.
        Image1.Picture.Assign(Clipboard);
        dbimage3.Picture.Assign(Image1.Picture);
        ///
        Exit;
     end;
     if(ImgNum = 3) then begin
        ImgNum := 0;
        ///DbImage does store headers.
        dbImage4.WriteHeader:=True;
        ///TImage to DbImage.
        Image1.Picture.Assign(Clipboard);
        dbimage4.Picture.Assign(Image1.Picture);
        Exit;
     end;

  end
  else ShowMessage('Clipboard Does not cantain an image.');
end;
///New Roll button.
procedure TForm1.Button4Click(Sender: TObject);
begin
  DBNavigator1.BtnClick(nbInsert);  ///Creates a new roll.
end;
///OnCreate().
procedure TForm1.FormCreate(Sender: TObject);
begin
  ImgNum := 0;
  DBNavigator1.BtnClick(nbInsert);  ///Creates a new roll.
end;

end.
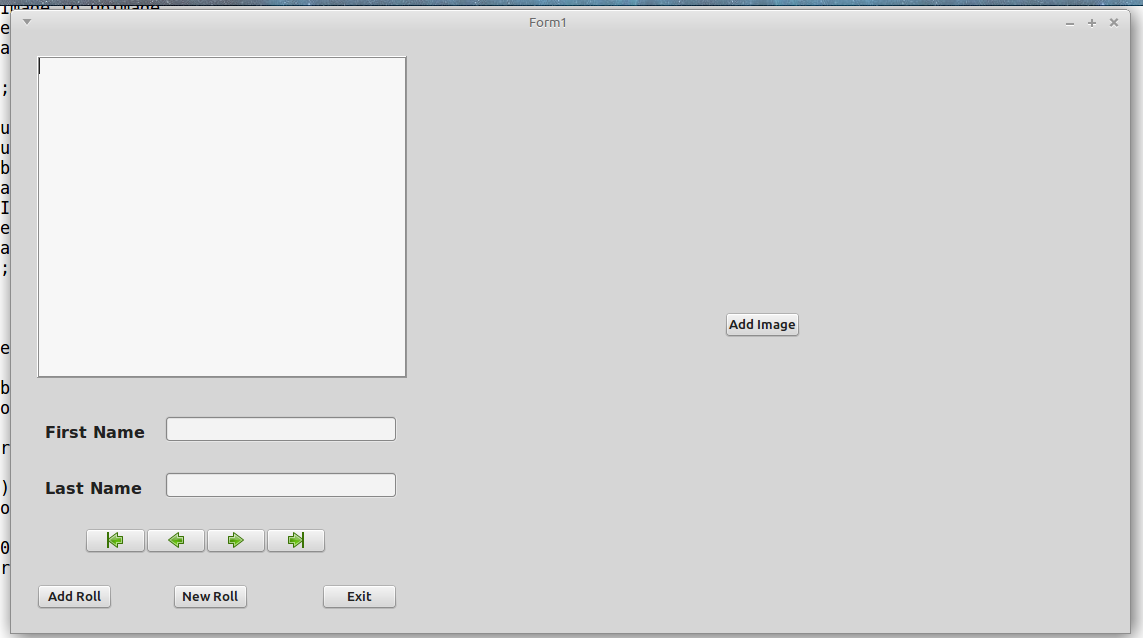
Type in a name in "First Name".
Type in a name in "Last Name".
Type in something into the memo window.
--- Adding images ---
Open a web browser and right click on an image, and choose "Copy Image".
On the form click the "Add Image" button. It will add the image.
Do the same for the rest of the DBImages.
You do not need 4 images. It will store the roll anyway.
Press the "Add roll" to add the entry.
Press "New Roll" to start a new roll.
Press "Exit" to exit. If you do not press the "Add Roll" button before the "Exit" button the roll will not be saved.
.
Gary Russell (ISSW)
ghrussell@yahoo.com
https://russellman128.angelfire.com/
Nov 27 2017
.